The Complete Guide to Calling an Optimly Agent Using cURL

This guide provides a comprehensive, step-by-step walkthrough for integrating with Optimly agents using cURL. Learn how to authenticate, send messages, manage conversations, handle errors, and apply best practices for production deployments. Whether you're a developer or a no-code user, you'll find actionable examples and troubleshooting tips for every scenario.
Reference Examples: For more advanced and production-ready examples, visit the official repository: optimly_examples
Table of Contents
- Introduction
- Prerequisites
- API Overview & Message Flow
- Authentication Methods
- Obtaining Your API Key
- Sending Your First cURL Request
- Understanding the Response
- Conversation Management
- Advanced Integration Patterns
- Error Handling & Troubleshooting
- Best Practices for Production
- Real-World Scenarios
- FAQ & Edge Cases
- Conclusion
Introduction
Optimly is a next-generation agentic analytics platform for conversational AI, automation, and customer engagement. The fastest way to validate your integration is with a simple cURL request. This guide walks you through every step, from zero to production, with deep technical detail and real-world context.
Prerequisites
- An Optimly account
- Access to your agent's API key (see Obtaining Your API Key)
- cURL installed (available by default on Linux, macOS, WSL, and Git Bash)
- (Optional) Access to optimly_examples for reference implementations
API Overview & Message Flow
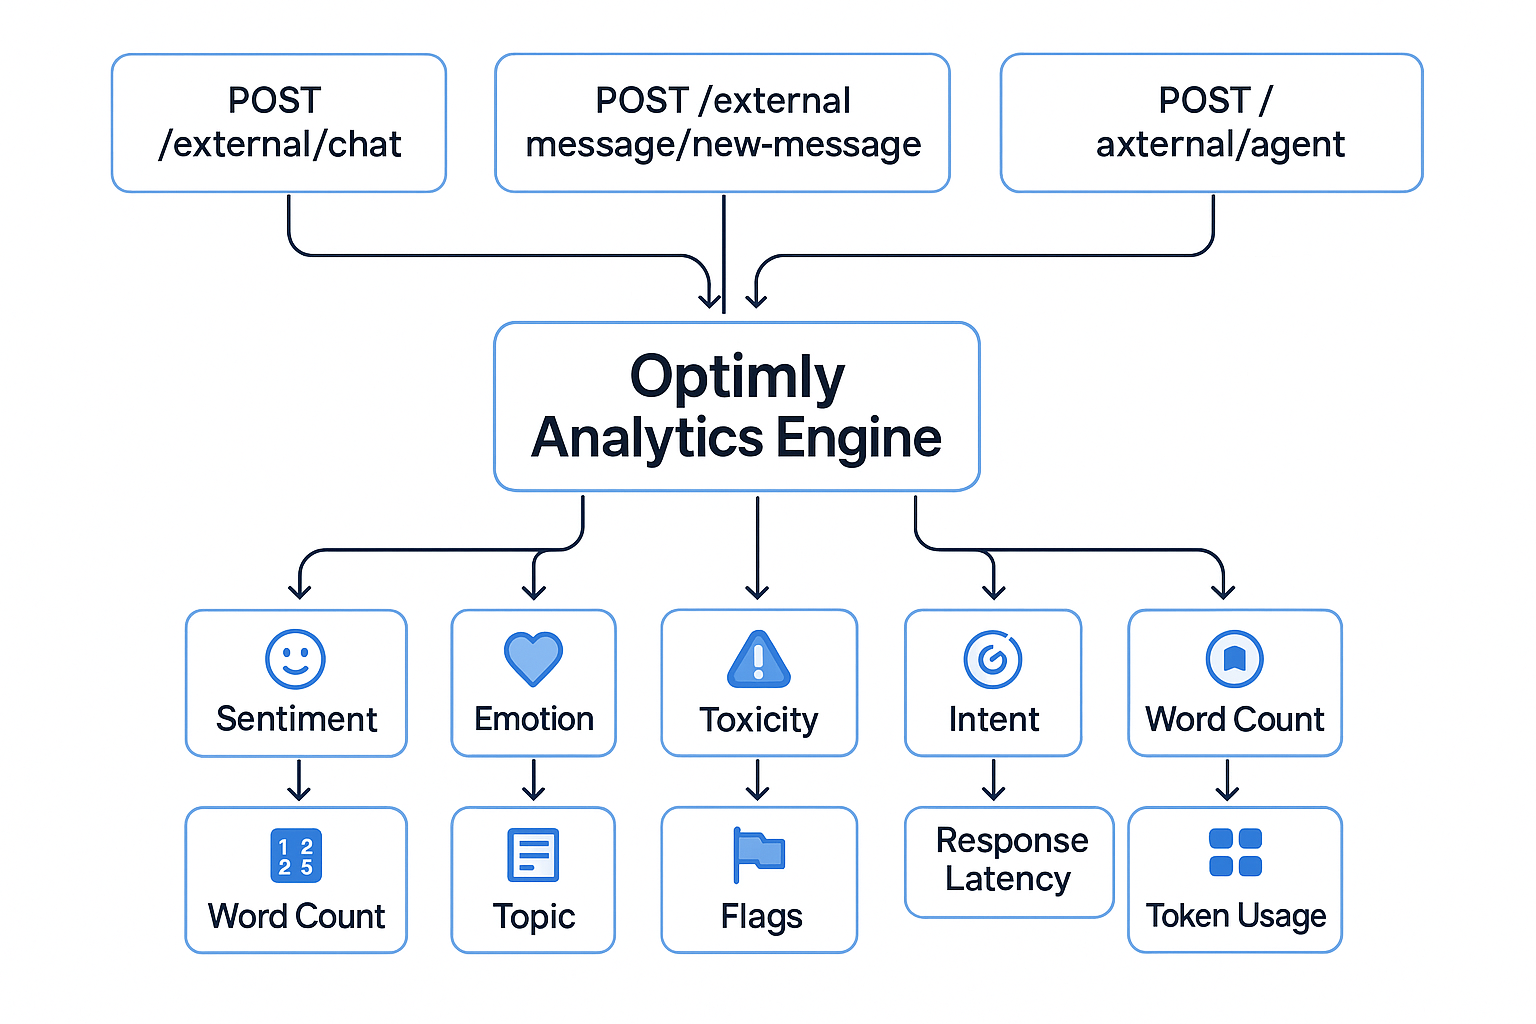
Optimly exposes a clean, RESTful API for chat-based interactions:
- Chat creation:
POST /external/chat - Send user message:
POST /external/message/new-message - Request agent response:
POST /external/agent
All endpoints feed into the analytics engine, storing:
- Sentiment, emotion, toxicity
- Word count, intent, topic
- Flags, response latency, token usage
Authentication Methods
Optimly supports three authentication patterns:
- Header:
x_api_key(recommended for server-to-server) - Header:
Authorization: Bearer <token>(middleware integrations) - Query Parameter:
?access_token_query=<token>(no-code tools)
Example (using x_api_key):
curl -X POST "https://api.optimly.io/external/agent" \
  -H "Content-Type: application/json" \
  -H "x_api_key: $OPTIMLY_API_KEY" \
  -d '{
        "chat_id": "demo_chat_001",
        "content": "Hello Optimly, I am testing the cURL integration."
      }'
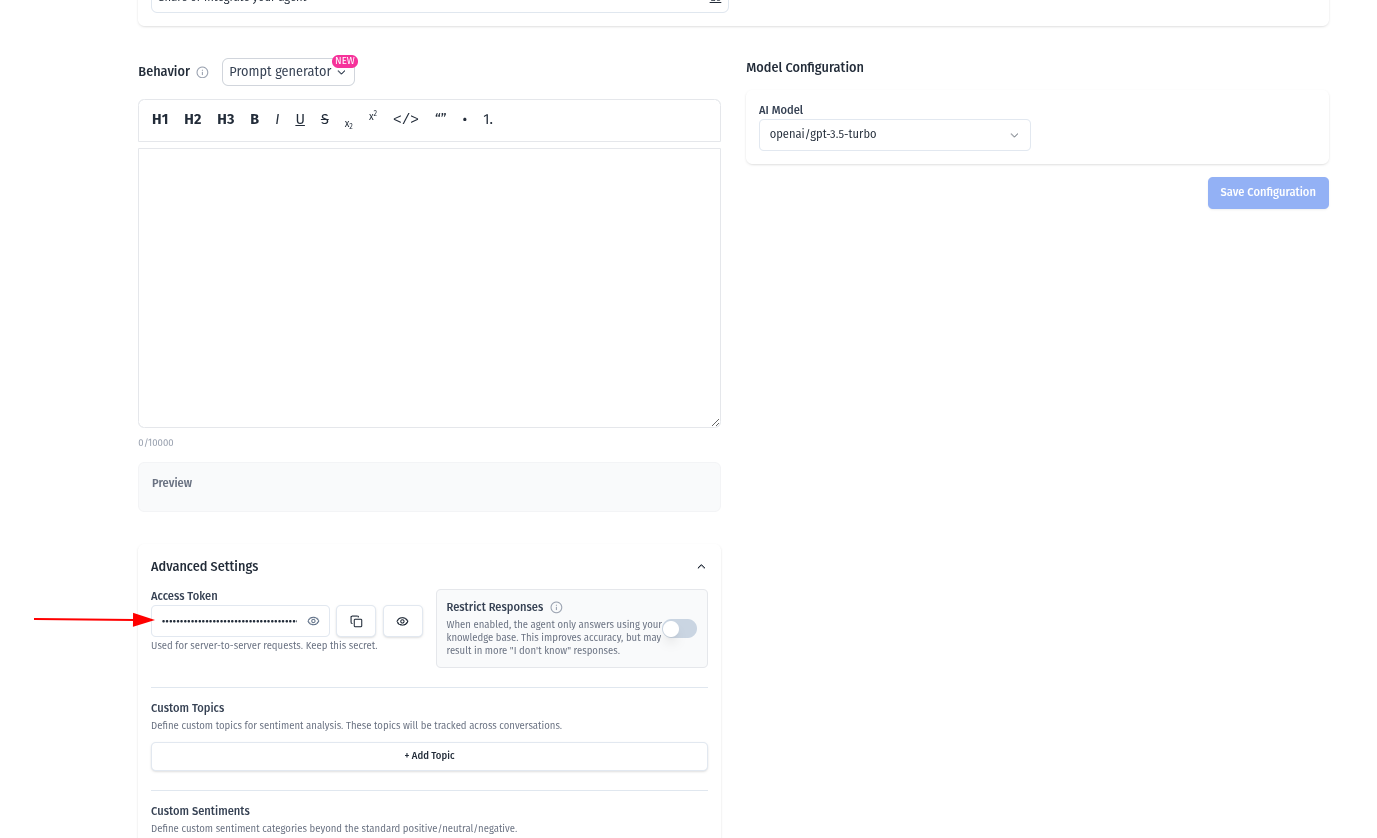
Obtaining Your API Key
API keys are assigned per agent. To retrieve yours:
- Go to Dashboard → Agents
- Select your agent
- Copy the API Key from the configuration page
Set it in your shell:
export OPTIMLY_API_KEY="your-key-here"
Sending Your First cURL Request
Important: You must first create a chat to obtain a valid
chat_idbefore calling the agent. The agent endpoint will not work without a validchat_id.
1. Create a New Chat
Send a request to the /external/chat endpoint to create a new chat. Note: The chat_id is generated by the API and cannot be selected or set by the user. You only provide your client_id (user_id) in the request.
curl -X POST "https://api.optimly.io/external/chat" \
  -H "Content-Type: application/json" \
  -H "x_api_key: $OPTIMLY_API_KEY" \
  -d '{
        "client_id": "customer_001",
        "ai_enabled": true,
        "lead_collected": false
      }'
The response will include a system-generated chat_id (e.g., "chat_id": "test_chat_123"). Use this value in the next step.
2. Call the Agent with the chat_id
Now, use the returned chat_id to send your first message to the agent:
curl -X POST "https://api.optimly.io/external/agent" \
  -H "Content-Type: application/json" \
  -H "x_api_key: $OPTIMLY_API_KEY" \
  -d '{
        "chat_id": "test_chat_123",  # Use the chat_id from the previous step
        "content": "Hello Optimly! This is my first message."
      }'
What happens internally:
- Optimly receives the message
- Fetches agent configuration
- Generates LLM response
- Logs message, metadata, analytics, timing, tool execution
- Returns JSON immediately
- Dashboard updates in real time
Understanding the Response
Typical response:
{
  "response": "Hello! How can I help you today?",
  "content": "Hello! How can I help you today?",
  "execution_time": 0.5,
  "success": true,
  "language_detected": "english",
  "tools_executed": 0,
  "performance_optimized": true,
  "framework": "legacy"
}
Key fields:
response: Canonical agent outputexecution_time: Latency in secondslanguage_detected: For analytics segmentationframework: Internal pipeline used
Conversation Management
Continuing the Conversation
To append a message:
curl -X POST "https://api.optimly.io/external/message/new-message" \
  -H "Content-Type: application/json" \
  -H "x_api_key: $OPTIMLY_API_KEY" \
  -d '{
        "chat_id": "test_chat_123",
        "sender": "user",
        "content": "Can you explain your pricing?"
      }'
Creating a New Chat
curl -X POST "https://api.optimly.io/external/chat" \
  -H "Content-Type: application/json" \
  -H "x_api_key: $OPTIMLY_API_KEY" \
  -d '{
        "client_id": "customer_001",
        "ai_enabled": true,
        "lead_collected": false
      }'
Returns a fresh chat_id for use in /external/agent.
Advanced Integration Patterns
- Omnichannel Client IDs: Use deterministic client IDs for unified conversations (e.g.,
whatsapp_<phone_number>,email_<thread_id>,web_<session_id>; thechat_idis always generated by the API) - External IDs: Store CRM, email, or WhatsApp sender IDs for cross-channel tracking
- Query Param Authentication: For no-code platforms, use
?access_token_query=<key> - Multi-agent Routing: Assign different agents per channel or use case
- Analytics Integration: Leverage Optimly's analytics for sentiment, intent, and performance tracking
Omnichannel Integration Architecture
Error Handling & Troubleshooting
| Error Code | Meaning | Typical Cause | Resolution |
|---|---|---|---|
| 401 | Not authenticated | Missing/invalid key | Check API key |
| 403 | Forbidden | Key not linked to agent | Use correct agent key |
| 422 | Validation Error | Bad payload | Check chat_id, content, JSON |
| 500 | Internal Error | Malformed payload, agent config, upstream issues | Retry, simplify message |
Debugging Tips:
- Always validate payload structure
- Use the dashboard to inspect message logs and analytics
- For persistent errors, test with optimly_examples
- Use simple messages to isolate issues
Insert: Error Handling Flowchart
Best Practices for Production
- Security: Never expose API keys in client-side code
- Rate Limiting: Monitor and respect API rate limits
- Logging: Log all requests and responses for audit and debugging
- Monitoring: Use Optimly dashboard for real-time analytics and alerts
- Versioning: Track API changes and update integrations accordingly
- Testing: Use the optimly_examples repo for integration tests
Real-World Scenarios
- WhatsApp Automation: Use deterministic chat IDs for each phone number
- Webchat Deployments: Integrate with session-based chat IDs
- CRM Tracking: Store external IDs for unified customer history
- Multi-agent Routing: Route messages to different agents based on channel or intent
- Lead Scoring & Analytics: Leverage Optimly's built-in metrics for sales and support automation
Insert: Real-World Integration Example agent response. Use a friendly, modern style with clear color coding for each channel.
FAQ & Edge Cases
Q: Can I use Optimly with no-code platforms? A: Yes, use query param authentication and reference optimly_examples for templates.
Q: What if my agent doesn't respond? A: Check API key, agent configuration, and dashboard logs. Test with a simple message.
Q: How do I track analytics for each message? A: All analytics are logged and visible in the dashboard under Agents → Conversations.
Q: Can I use multiple agents? A: Yes, each agent has a unique API key and configuration.
Conclusion
With a single cURL request, you can validate your Optimly integration and unlock advanced analytics, automation, and omnichannel support. For production-grade examples, troubleshooting, and best practices, always reference the optimly_examples repository.
Everything begins with this first message.
Contact us for custom diagrams or submit a PR to the optimly_examples repo to share your own!
Try Optimly
Optimly provides LLM‑native analytics across web and messaging with minimal setup. Start free and ship your pilot in minutes.